
Working Remotely
Objectives
- Understand how to log in to a remote computer
- Understand public and private ssh keys
- Understand how to move files between computers
Let’s take a closer look at what happens when we use a desktop or laptop computer. The first step is to log in so that the operating system knows who we are and what we’re allowed to do. We do this by typing our username and password; the operating system checks those values against its records, and if they match, runs a shell for us.
As we type commands, the 1’s and 0’s that represent the characters we’re typing are sent from the keyboard to the shell. The shell displays those characters on the screen to represent what we type, and then, if what we typed was a command, the shell executes it and displays its output (if any).

What if we want to run some commands on another machine, such as the server in the basement that manages our database of experimental results? To do this, we have to first log in to that machine. We call this a remote login, and the other computer a remote computer. Once we do this, everything we type is passed to a shell running on the remote computer. That shell interacts runs those commands on our behalf, just as a local shell would, then sends back output for our computer to display:

The tool we use to log in remotely is the secure shell, or SSH. In particular, the command ssh username@computer runs SSH and connects to the remote computer we have specified. After we log in, we can use the remote shell to use the remote computer’s files and directories. Typing exit or Control-D terminates the remote shell and returns us to our previous shell. In the example below, we use highlighting to show our interaction with the remote shell. We can also see that the remote machine’s command prompt is moon> instead of just $, and that it took Vlad a couple of tries to remember his password:
$ pwd
/users/vlad

$ ssh vlad@moon
Password: ***
Access denied
Password: ********
moon> pwd
/home/vlad
moon> ls -F
bin/     cheese.txt   dark_side/   rocks.cfg
moon> exit

$ pwd
/users/vlad
The secure shell is called “secure” to contrast it with an older program called rsh, which stood for “remote shell”. Back in the day, when everyone trusted each other and knew every chip in their computer by its first name, people didn’t encrypt anything except the most sensitive information when sending it over a network. However, that meant that villains could watch network traffic, steal usernames and passwords, and use them for all manner of nefarious purposes. SSH was invented to prevent this (or at least slow it down). It uses several sophisticated, and heavily tested, encryption protocols to ensure that outsiders can’t see what’s in the messages going back and forth between different computers. A later chapter will talk about how this works, and how secure it really is.
ssh has a companion program called scp, which stands for “secure copy”. It allows us to copy files to or from a remote computer using the same kind of connection as SSH. The syntax is a simple mix of cp’s and ssh’s. To copy a file, we specify the source and destination paths, either of which may include computer names. If we leave out a computer name, scp assumes we mean the machine we’re running on. For example, this command copies our latest results to the backup server in the basement, printing out its progress as it does so:
$ scp results.dat vlad@backupserver:backups/results-2011-11-11.dat
Password: ********
results.dat              100%  9  1.0 MB/s 00:00
Copying a whole directory is similar: we just use the -r option to signal that we want copying to be recursive. For example, this command copies all of our results from the backup server to our laptop:
$ scp -r vlad@backupserver:backups ./backups
Password: ********
results-2011-09-18.dat              100%  7  1.0 MB/s 00:00
results-2011-10-04.dat              100%  9  1.0 MB/s 00:00
results-2011-10-28.dat              100%  8  1.0 MB/s 00:00
results-2011-11-11.dat              100%  9  1.0 MB/s 00:00
Now suppose we want to check whether we have already created the file backups/results-2011-11-12.dat on the backup server. Instead of logging in and then typing ls, we could do this:
$ ssh vlad@backupserver ls results
Password: ********
results-2011-09-18.dat  results-2011-10-28.dat
results-2011-10-04.dat  results-2011-11-11.dat
SSH has taken the arguments after our username and the name of the computer we want to run on and passed them to the shell on the remote computer. Since those arguments are a legal command, the remote shell has run ls results for us and sent the output back to our local shell for display.
Creating and Managing Keys
Typing in our password every time we want to access a remote machine is more than a minor annoyance. Imagine what would happen if we wanted to run a program on a remote machine for all combinations of three different parameters. We want to do something like this:
for density in {20..29}
do
  for viscosity in 0.70 0.71 0.72 0.73 0.74
  do
    for temperature in 0.001 0.002 0.003 0.004 0.005
    do
      ssh vlad@fastmachine ./simulation -x -d $density -v $viscosity -v $temperature
    done
  done
done
If we actually try to do this, though, we will have to sit at our keyboard and type in our password 250 times. What we want is a way to authenticate ourselves to the remote computer automatically.
We can do this using a technique borrowed from public key cryptography. More specifically, we will create a key pair consisting of a public key and a private key. These keys have two interesting properties:
- Anything that one encrypts, the other can decrypt. For example, if we encrypt our password with the private key, only the public key can decrypt it, while if we encrypt the contents of a file with the public key, only the private key can decrypt it.
- Given one key, it is practically impossible to find the other, where “practically impossible” means “can’t be done in the expected lifetime of the universe using any computer we can conceive of” (though quantum computing may one day change that—consult your nearest wild-eyed physicist for details).
Once we have created a key pair, we can put the public key on the remote machine we want access to, and keep the private key on our local machine. So long as they are where SSH expects them to be, it will use them instead of asking us for a password.
The first step is to create the key pair, which we do using ssh-keygen:
$ ssh-keygen -t rsa
Generating public/private rsa key pair.
Enter file in which to save the key (/users/vlad/.ssh/id_rsa): ↵
Enter passphrase (empty for no passphrase): ↵
Your identification has been saved in /users/vlad/.ssh/id_rsa.
Your public key has been saved in /users/vlad/.ssh/id_rsa.pub.
The key fingerprint is: d3:1a:27:38:aa:54:e8:a5:03:db:79:2f:b2:c3:c9:3d
The -t rsa option tells ssh-keygen to create an RSA key; there are other types, but this one is the most commonly used. The “↵” character indicates a carriage return: we want to put the key in the default location so that SSH will know where to find it, and we don’t want a passphrase (since the whole point is to be able to log in without typing a password), so we just type enter in response to both questions.
Let’s look in the .ssh directory under our home directory:
$ cd
$ ls .ssh
id_rsa  id_rsa.pub
The first file, id_rsa, contains our private key. Never put this on a remote machine, send it by email, or share it with anyone (unless you really want them to be able to impersonate you). The other file, id_rsa.pub, contains the matching public key. Let’s copy it onto the remote machine we want to access:
$ scp .ssh/id_rsa.pub vlad@fastmachine:id_rsa.pub
Password: ********
id_rsa.pub              100%  1  1.0 MB/s 00:00
We still have to type our password because the public key isn’t in the right place on the remote machine when we run scp. Let’s take care of that by logging into the remote machine and creating a .ssh directory there:
$ ssh vlad@fastmachine
Password: ********

$ mkdir .ssh
The next step is to copy the public key into a file in the .ssh directory called authorized_keys:
$ cp id_rsa.pub .ssh/authorized_keysThe final step is to make sure that permissions are set properly on .ssh and authorized_keys. This is an extra security measure: if anyone but us can read or modify them, SSH will assume that they aren’t secure any longer. The right permissions are:
- owner has read, write, and execute for the
.sshdirectory; - owner has read and write for
.ssh/authorized_keys; and - nobody has anything else.
The correct commands are:
$ chmod u=rwx,g=,o= .ssh
$ chmod u=rw,g=,o= .ssh/authorized_keys
We’re all set. Let’s exit from the remote shell and try running a command to see if everything is working:
$ exit
$ ssh vlad@fastmachine pwd
/home/vlad
Here is what is on both machines after we created and installed the keys:
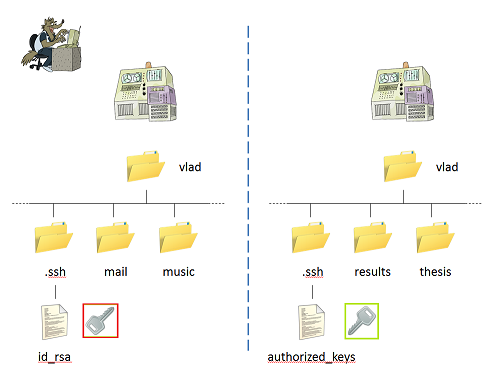
We can now run ssh (and scp) from our local machine to the remote machine without having to authenticate every time. This only works one way, though: having the public key installed in the remote machine’s authorized_keys file does not give that machine permission to log in to our local machine. If we wanted to do that, we would have to generate a key pair on the remote machine and copy its id_rsa.pub to our local authorized_keys file.
What if we want to connect to a machine from several other machines? For example, suppose we want to be able to copy files to and from the backup server from our laptop, our desktop computer, and the machine in the lab. To handle this, we add each machine’s id_rsa.pub file to the remote machine’s .ssh/authorized_keys file. We can do this with an editor, or more simply use cat and >> to append one file to another:
$ scp id_rsa.pub vlad@backupserver
Password: ********

$ ssh vlad@backupserver
Password: ********

$ cat id_rsa.pub >> .ssh/authorized_keys

$ rm id_rsa.pub

$ exit
Key Points
- FIXME